It is recommended that samples be prepared off-site before arriving at the CLS. If on-site preparation is required, please see additional information about Laboratories and Equipment available (Laboratories and Equipment)
Preparing samples for adequate transmission or fluorescence measurements requires different strategies for different cases, and comes from experience. There are various sources of useful information, particularly the book XAFS for Everyone.
Sample Space Overview
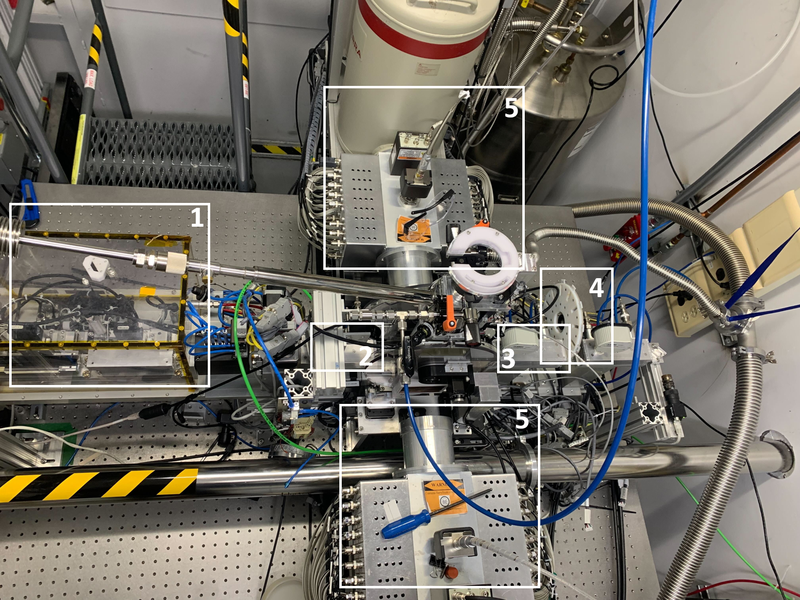
The figure above shows the available space for the sample setup on BioXAS-Main.

The figure above shows the available space for the sample setup on BioXAS-Side.
Both beamline endstations feature
(1) DBHR (He filled)
(2) First ion chamber (N2 or Ar filled)
(3) Second ion chamber (N2 or Ar filled)
(4) Foil Wheel
(5) Detectors (32 element Ge, PIPS)
The sample holder or cryostat is located between the first ion chamber (1) and the second ion chamber (2), in the beam direction, and between the fluorescence filters and detectors (5), in the direction across the beam.
Dimensions
The available space is ~ 20 cm x 7 cm. The sample holder or cryostat are mounted on a motorized stage that is smaller at 5 cm x 7 cm . The stage has a travel range of 2 x 2 x 2 cm and is used to align the sample with the beam or to scan multiple samples in the same holder.
Sample Environment
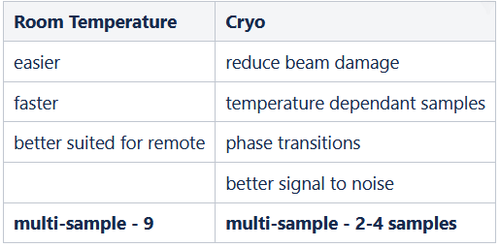
There are many reasons to measure at low temperatures, but it also has its disadvantages. This section compares room temperature measurements and cryo temperature measurements to help you decide what's best for your experiment.
Low sample temperatures in general :
- Make EXAFS more intense due to dampening of atomic vibrations
- Reduce radiation damage (photo-oxidation or photoreduction)
Low sample temperatures sometimes :
- Are needed for unstable or sensitive samples
- Are used to probe phase transitions
- Are used to protect sample from beam-induced damage
- Are used to protect oxygen-sensitive samples by providing an anaerobic environment in the cryostat
How Low?
- Liquid nitrogen (77 K) - adequate for most samples - see table
- Liquid helium (10 K) - for biological samples and some single atom material science studies
Disadvantages of low temperatures:
- Undesirable physical change to sample (phase change, crystalline structure, magnetic ordering)
- Measuring with a cryostat takes longer per sample (loading and unloading, temperature stabilization)
Technicalities:
- The lower the temperature, the bigger the benefits → measuring with a cryostat cooled with LHe (~10 K) has a more "protective" and "EXAFS enhancing" effect than measuring at LN2 Temperatures (~ 80 K).
- LN2 is always available and doesn't run out
- LHe has to be ordered, only last for ~5 measurement days, and it's in general more complicated (and expensive) to get.
- only request LHe when LN2 won't be enough for your experiments. (contact beamline staff to discuss)
When to use room temperature:
- beam-stable samples
- many samples to measure
- high temperature phase transition or catalyst measurements
Sample Preparation
Sample preparation will depend on the type of sample. For solids, the first step is to estimate the thickness of the material required to produce a total absorption length between 0/5 and 2 units. If it is your first time making this estimation, please contact beamline staff for help. To start the calculation, see Sample Thickness Optimization.
Please Contact Us if you have questions on sample preparation or visit XAS Solid Sample Plate Prep, Tape Method or doubly contained samples for XAS measurements for a quick tutorial
Before you prepare your sample you must decide:
- How to measure your sample? Transmission or Fluorescence (or both)
- What low Z material to use for dilution? cellulose, BN, PEG, etc.
- What size/shape sample? a pellet, fill a slot, pack in a Kapton capillary, or spread on tape
For solid materials, the samples can be prepared as pressed pellets 6, 10 or 13 mm in diameter (see Pellet Procedure, or as stacks of material spread on tape (see Preparing Samples by the Spread on Tape method). The resulting sample on tape should ideally be a rectangle with one or multiple layers and 4 mm tall by 12 mm wide. For room temperature measurements, in practice, any other sample format can be accommodated as long as it's not too small. Samples can also be prepared in pellets of different sizes ( 5 ,10 ,13 mm). See attached for details on how to prepare pellet samples. For liquid samples to be measured at low temperatures, the ideal is a cuvette filled with the sample, and no more than 27 mm long.
Spread on tape method
The spread on tape method allows for the preparation of stacked layers of thinly spread material. At BioXAS, we prefer to use Kapton instead of scotch tape, as scotch tape may have trace metal impurities.
Sample Optimization
Preparing samples for adequate transmission or fluorescence measurements requires different strategies for different cases, and to know best practices, which come from experience. The following considerations should be taken into account when preparing and optimizing:
- Sample Thickness: How thick is the sample of interest? The thickness should be sufficient but optimal for transmission and not suffer from over absorption (self absorption). This thickness changes when the beam is at a 45 deg angle as opposed to a 90 deg angle.
- Sample Concentration: What is the concentration of your sample. Is Transmission or Fluorescence the mode of interest.
- Sample Dilution: See attached for information on sample dilution if sample is too concentrated or is a standard.
Video Tutorials
There are many ways to prepare samples for XAS measurements. There are some excellent sample preparation tutorials from the SSRL linked below:
SSRL XAS solid sample plate preparation
SSRL XAS solution sample holder preparation
SSRL XAS multisample cassette loading for LHe cryostat
Calculating transmission edge jumps
Sample Holders
Room temperature
At room temperatures, the main restrictions on the size of a sample is it must be bigger than the beam spot. However, if multiple samples are going to be mounted on the same sample holder there are some size requirements. See
Round sample holders for pellets
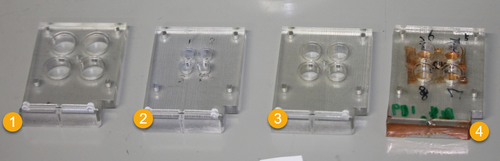
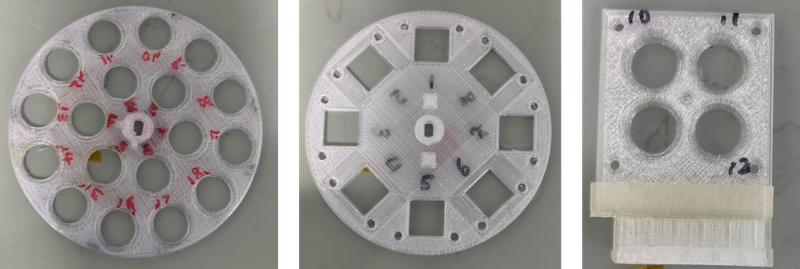
There is a set of sample holders specially designed for round pressed pellets, with diameters of 6, 10, and 13 mm respectively. Those holders can also be used with many other solid samples.
For instance, samples prepared by the spread-on-tape method can be just taped to the holders.
Low (cryogenic) temperature
The low-temperature sample holders are designed to fit inside an Oxford Instrument CF1200 Cryostat with an inner diameter of ~28 mm. The cryostat can be cooled with either Liquid Nitrogen (minimum temp ~80 K) and Liquid Helium (minimum temp ~10 K).
Slotted frames for solid samples measured at low temperature
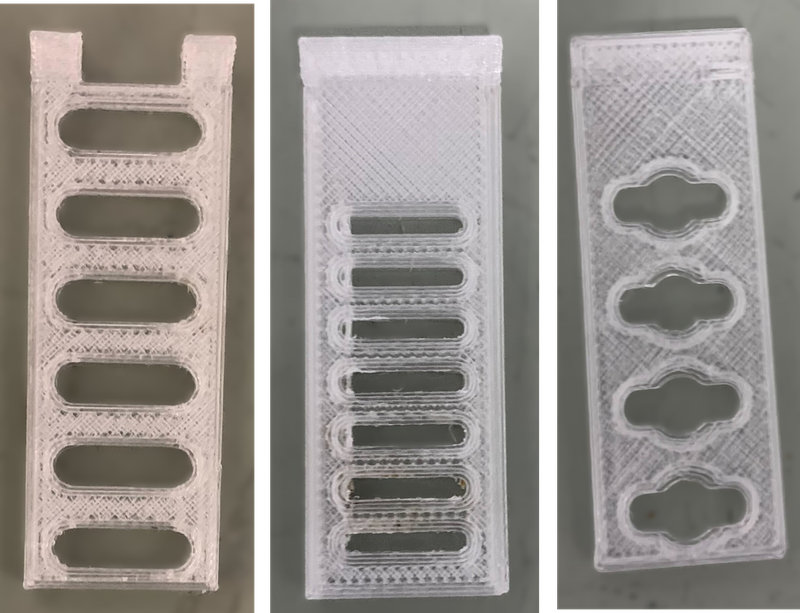
The slotted frames for solid samples work like the ones described in the room temperature section above. The same frames can be used for both applications. For low temperatures, the frames are mounted on the cryostat rod, and for room temperature, the frame go on a holder with a goniometer.
Cuvettes for frozen liquid samples
For samples that are liquid at room temperature is common to use cuvettes where the liquid is injected and then frozen. These are some of the typical cuvettes used with our cryostats. The length of the 45 degree cuvettes is ~27 mm. Please contact the beamline staff for more information.