Motivation
It is important to know the characteristics of a beamline in order to prepare effective and feasible proposals. Once you are awarded beamtime, it is important to have a sound experimental plan to make effective use of the beamtime. Please click here for a detail on experimental considerations pertaining to an XAS experiment. Click here to understand if elements on interest are plausible to collect at BioXAS.
This section contains information needed for experimental planning at the BioXAS Sector.
Using the following information along with yours or your group's experience with Synchrotron Experiments, the following items should be decided to plan a realistic and effective experiment.
- What are the scientific questions to be answered by the experiment? Clarity on this will help with the rest.
- What set of samples can help answer those questions? (Note: If possible pick a core-set of samples and measurements to start with. More details in the sections below.)
- Define a set of samples under investigation to be measured.
- Define a set of standards to be measured. See the section: Selection of Standards below.
- What type of measurements to conduct (XANES, EXAFS, etc.).
- How to prepare the samples?
- What conditions the samples should be under during the experiment? See the section: Measurement conditions below.
- Scan configuration and number of repetitions for each sample. See the section: Scan configuration and repetitions below.
- How to organize the set of measurements so the required beamtime is minimized, but making sure the project team and CLS staff can cover all shifts properly?
- How many people to bring to CLS? See the section: On-site team size below.
Core-set of samples and measurements
It's advisable to pick a minimum set of samples and measurements that will answer one or more of the project's scientific questions and start with those during your beamtime. This is referred to a priority list. If there is sufficient time remaining, then it would be advisable to measure the non-essential samples. For instance, in a set of 5 samples with concentrations of 1, 2, 3, and 5 % of a given element, a trend (like the relation between concentration and bond length) can be established with samples 1, 3 and 5 alone, without using 2 and 4. The data sets contained in 2 and 4 will provide additional data but in most cases, those points are not critical, so they can be given lower priority when planning the experiment.
Selection of appropriate standards
If doing linear combination analysis or finger-printing (identifying the compound or phase), you will have to decide which standards to measure. The standards are typically pure or single-phase compounds. The set should cover all phases or compounds that you expect to be present in your sample. When the exact compounds to compare too are not available it's possible to use substitutes, for instance, As+3 (Arsenite) compounds show similar (but not exactly equal) XANES spectra around the As K-edge, independently of the specific compound where it's found; one can be used to identify similar ones.
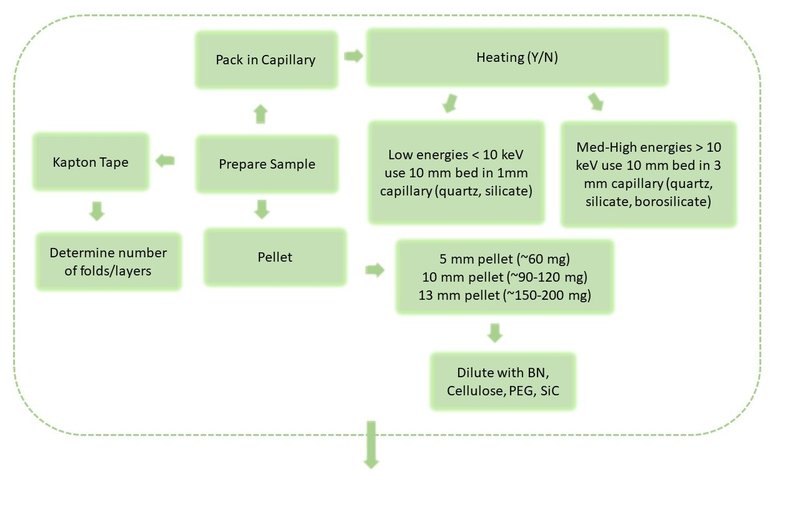
Sample preparation
For instance, for solid powder samples, the alternatives include the Spread on Tape method, packing the powder in a frame with or without dilution, pressing it into pellets, etc.
For more information see Preparing samples.
Measurement conditions
It's important to decide in advance under which conditions to measure. For instance, room vs. low temperature. In general measuring at low temperatures produces less noisy data given the reduced thermal disorder in the sample, and also helps protect the samples from beam damage. However if the temperature will change some of the important sample characteristics (for instance, low temperatures could change the magnetic ordering of the sample), make sure you stay within the temperature range that works for your experiment. Also, if you already conducted part of the study at BioXAS or somewhere else under a given set of conditions, and the new measurements are part of that study, it's advisable to keep the new conditions similar to the old ones, so the comparison with previous results is not affected by changing conditions.
Checklists
Feasibility Checklist
When preparing to submit a proposal
- Contact beamline staff that you plan to submit a proposal
- Check submission deadlines
- Previous characterization of sample - what you know already regarding the sample
- Question(s) you are hoping to answer with XAS
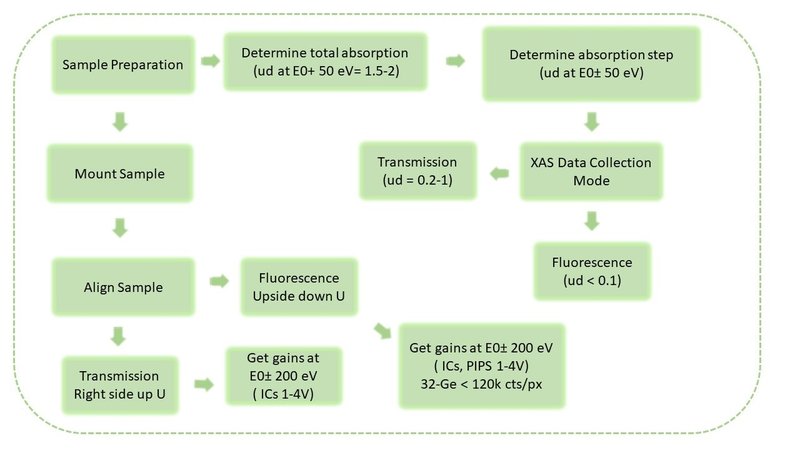
- Mode of data collection (Transmission or Fluorescence)
- XANES or EXFAS measurements?
- Method for sample preparation ( Powder, pellet, liquid, etc)
- Room temperature or Cryostat
- Time estimation per scan- do the total number of shift suffice for the lifetime of the proposal?
- Sample list
- Standards list
- Reference foil(s) needed
Measurement Checklist
- Beamtime scheduled
- Sample prepared off-site or shipped to CLS
- Tutorials on preparing samples
- Workflow_Plan
Arriving at the beamline
- Team members at beamtime need for successful measurements (Team shifts scheduling)
- Attend and pass beamline specific orientation training (BSO)
- With the help of the beamline scientist, the beamline is aligned to the desired energy
- Review Acquaman tutorial
- Mount sample
- For room temperature
- For cryostat (2-3 hours)
- review He/Purge procedure
- open shutters
- Start Acquaman
- Enter project number
At the Beamline
Energy Calibration (may need to be done with no sample in place)
- Select reference foil
- Insert fluorescence filter
- Run energy calibration scan
- Calibrate
- Verify the energy resolution is sufficient
Making a measurement
- Find position on sample (s)
- Select Element energy
- Align sample
- Generic scan z select max signal
- copy value into cryostat stage
- Generic scan y select max signal
- copy value into cryostat stage
- Generic scan z select max signal
Note: for Transmission measurement unselect inboard and outboard Ge32 before taking a generic scan
For Sample Transmission measurements
- Select Element
- Adjust ion chamber gains (1 - 4 V)
- 200 eV below,
- at edge
- 200 eV above
- if setting up multiple samples, note the gains for each sample position
For Fluorescence measurements
- Select Element
- Set energy 200 eV above element of interest
- Go to outboard Ge 32 – initialize then acquire
- Adjust ROI of element(s) edge of interest
- Check counts - should be 100 k per pixel
- 5-10 eV below edge
- at edge
- 5 - 10 eV above edge
- Adjust detector distance and jj slits to adjust counts higher or lower
For all measurements
- Set up short XANES scan to verify sample looks as expected
- Set up XANES OR EXAFS scans
- Set up workflow (if using)
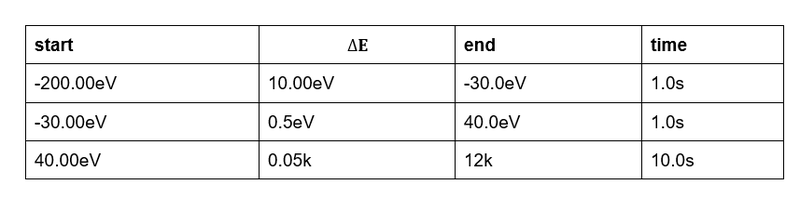
Setting up XANES of EXAFS measurements (example region file)
Brief Guide For Sample Measurements at an EXAFS beamline:
Tips
- If the beam dumps wait 0.5 - 3 hours for optics to warm up (depending on how long machine was with no beam)
- Contact Us to change energy if energy is 3-4 elements different
- If sample is sensitive to beam damage, move sample position after setup and for each subsequent scan
| List of Foils |
|---|
| Ti, V, Cf, Mn, Fe, Co, Ni, Cu, Zn, As, Se, Y, Zr, Mo, Pd, Ag, Cd, In, Sn, Sb, Ta, W, Pb, Bi |
| List of Filters |
|---|
| 1 absorption filter: Sr(1), Pd (1), Ag (1), Cd, In (1), Ge(1) |
| 3 absorption filters: Ti, V, Cr, Mn, Fe, Co, Ni, Cu, Zn, Ga, Ge, As, Se, Y, Zr, Mo, Ru, Cd |
| 6 absorption filters: Ti, V, Cr, Mn, Fe, Co, Ni, Cu, Zn, Ga, Sr, Zr, Ru, Mo, Ru |
Experimental Plan Summary
The information provided above serves as a guideline for a smooth experimental run. Please refer to the following Workflow_Plan, Experiment Time Planning and Experiment Log Book for you and your team. It is useful when working in pairs with shift changes to have an online live document so each member of your team are informed of the plans.