Introduction
This section is a guide for preparing a General User Proposal for BioXAS-Spectroscopy beamlines. Familiarize yourself with the the proposal preparation process at the Canadian Light Source Apply for Beamtime. In order to receive beamtime through the CLS user portal. Please ensure there is an active and established user agreement.
About BioXAS in particular
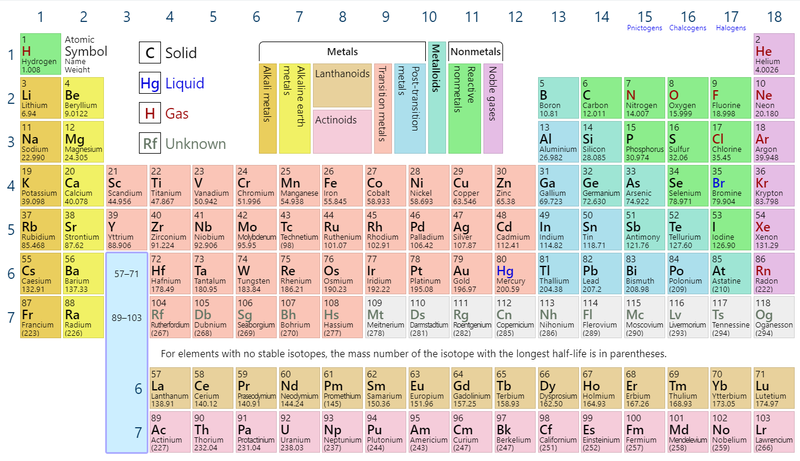
BioXAS can measure several elements across the Periodic Table from 5.0 keV to 30 keV
Goals of the Proposal
Understand what you want to measure and what you want to obtain from the data. Describe the relevant aspects of your experiment and use sufficient detail. Answer the questions: What is needed to carry out the experiments successfully? How is the data going to be processed. How many samples are you going to measure and how long will that take? Plan the experiments to maximize beamtime.
Once you have a well thought and realistic plan for the proposed experiment at BioXAS, it's important to explain the importance of the project. The proposal will be evaluated for Scientific Merit.
- Does the proposal describe what is to be studied and the importance of it?
- What hypothesis would be tested?
- How will the results impact the field?
- What is the likelihood of success?
How To of Proposals:
New to XAS?
Please check out our XAS primer
Transmission vs Fluorescence
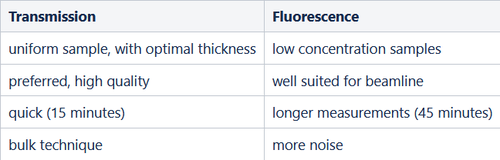
Which method to use?
Transmission
- If you can readily get X-rays through the sample + substrate (and the edge step is > 0.1), use transmission, otherwise use fluorescence
- Samples should be made uniform on a scale determined by the absorption length of the material
- Total thickness should be kept below <2-3 absorption lengths to minimize thickness effects
- Element of interest must be concentrated enough to get a decent edge jump
- pinholes and large thickness variation should be minimized
- Absorption length should be calculated when you’re designing experiments and preparing
samples
Fluorescence
- If the sample is dilute, use fluorescence. If it is not dilute, the data may be distorted and fluorescence corrections may be needed.
- Even if the sample is dilute on average, you have to consider particle size
Summary
- Biggest considerations:
- thickness effects in transmission
- fluorescence self-absorption
- particle size is important for both transmission and fluorescence
- Further reading on thickness effects Thickness Effects
- Further reading on sample preparation theory Sample Preparation by Grant Bunker
XANES vs EXAFS
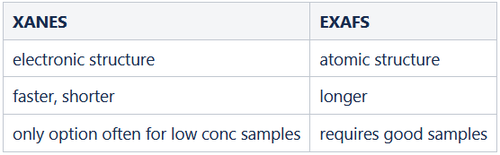
For further details EXAFS XANES History of the EXAFS Equation Quantitative EXAFS analysis
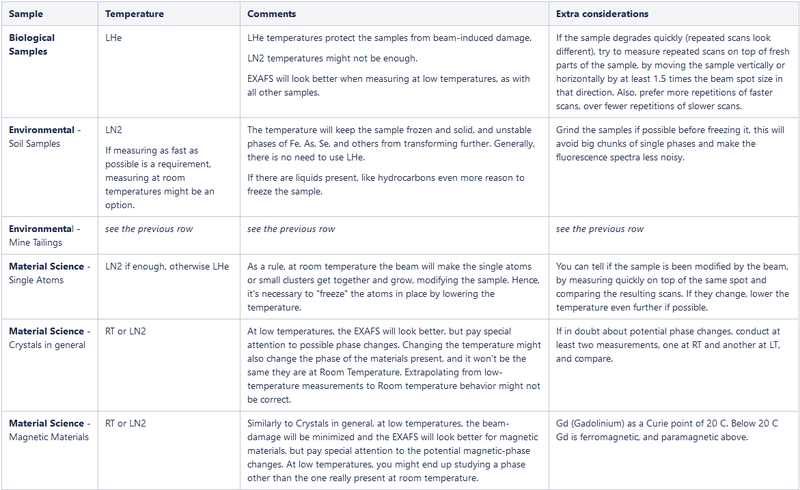
Sample Environment
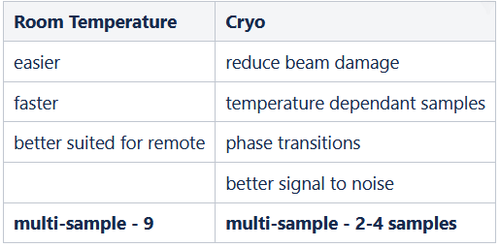
There are many reasons to measure at low temperatures, but it also has its disadvantages. This section compares room temperature measurements and cryo temperature measurements to help you decide what's best for your experiment.
Low sample temperatures in general :
- Makes EXAFS more intense due to dampening of atomic vibrations
- Reduce radiation damage (photo-oxidation or photoreduction)
Low sample temperatures sometimes :
- Are needed for unstable or sensitive samples
- Are used to probe phase transitions
- Are used to protect sample from beam-induced damage
- Are used to protect oxygen-sensitive samples by providing an anaerobic environment in the cryostat
How Low?
- Liquid nitrogen (77 K) - adequate for most samples
- Liquid helium (10 K) - for biological samples and some single atom material science studies
Disadvantages of low temperatures:
- Undesirable physical change to sample (phase change, crystalline structure, magnetic ordering)
- Measuring with a cryostat takes longer per sample (loading and unloading, temperature stabilization)
Technicalities:
- The lower the temperature, the bigger the benefits → measuring with a cryostat cooled with LHe (~10 K) has a more "protective" and "EXAFS enhancing" effect than measuring at LN2 Temperatures (~ 80 K)
- LN2 is always available and doesn't run out
- LHe has to be ordered, only last for ~5 measurement days, and it's in general more complicated (and expensive) to get
- Only request LHe when LN2 won't be enough for your experiments. (contact beamline staff to discuss)
When to use room temperature
- beam-stable samples
- many samples to measure
- high temperature phase transition or catalyst measurements
Time estimation
In the beamtime proposal experimental section you are asked to estimate how many shifts are required for the proposed research.
The required beam time to conduct experiments depends on:
- The required scan time per edge
- The time required to change samples
- The time required to prepare the beam-line to measure a different element
Scan time
- by default, each energy point should be integrated for 1 s in the XANES region, and for a time starting at 1s and increasing to 10 in the EXAFS region. See the table below for details.
- at least two scans should be collected for each edge (ideally 3 or more).
- no scan should last more than 1 hr, ideally 1/2 hr or less.
- When long total times per point are required (in diluted samples for instance), is better to capture multiple short-duration scans (less than 1 hr) than to capture a fewer very long-duration scans (example: 10 x 30 min scans is better than 2 x 2.5 hr scans, even when they both amount to 5 hr).
Changing sample time
- Room temperature -
- 5 minutes change sample holder
- 5 minutes per sample to find position(s)
- homogeneous samples faster for position finding
- Cryostat-
- 1-2 hours to thermalize
- 5 - 10 minutes per sample to find position
- Using more samples per rod decreases sample change time
- All samples
- finding detector gains and positions - 10 minutes per sample
Miscellaneous time
Beamline alignment
- Initial optics warming and energy alignment: 1 - 4 hours
- changing energy of adjacent elements: 10 - 30 minutes
- Changing energy of element edge greater than 3 keV: 30 - 90 minutes
Recovering from beam loss
- up to 1/3 day, 4-6 hours
Note on changing sample or changing edge
When there are multiple samples and multiple edges have to be measured
- it is usually faster to measure all or many samples at one edge, and then change to another edge and measure the samples again.
- takes less time to change samples than it takes to change edges.
- Unless the sample change involves the cryostat (30 - 90 mins) and the two edges are very close so there is no need to re-align the main optics or the end-station optics.
Example: if there are 3 samples inside the cryostat at the same time, and we need to measure Cu and Se edges, It's faster to measure all three samples at Cu first, and then move to Se and measure the 3 samples again, than it's to measure Cu and Se on a sample before moving to the next sample.
Resources for planning an experiment
XAFS for Everyone, by Scott Calvin- Chapter 2.
Useful Information
Please visit Useful Links for a collection of useful links and information related to XAS.